Daily almost I find myself in conversation with someone about whether materials will catch on. Coming from a creator (of usually mesh but not necessarily mesh) currently using materials as part of her work, the chat will normally wend its way around just how many people can see them anyway and what one should or shouldn't say in an ad for an object that includes materials. E.g. What exactly is "Materials Ready" supposed to mean?
Coming from a creator of mesh not currently using materials in her work the conversation will also revolve around just how many people can see them, but focused around a different sort of concern, which is whether the conversant needs to switch to a materials viewer yet or can afford to stall a little longer since apparently no one else can see them either.
I only ever guess that the number of people who can see materials is still very low, since on any given free sample giving day, I can rarely scare up more than a handful of people on a materials capable viewer (so far these are: the LL viewer, Kokua & Exodus). Add to that the fact that according to LL, the adoption of ALM (Advanced Lighting Model) is also still shockingly low, and the second kind of creator/conversant mentioned above (the one not yet using materials) has for now no real rush to switch viewers or get busy baking normal maps.
I should maybe clear up a possible confusion. You need a materials capable viewer to apply the material textures to an object. To see the effect produced by materials on an object, you need the materials capable viewer as well as ALM turned on. And this means that even some of the people using a materials viewer still aren't seeing materials because they may not have turned on ALM.
I just don't get that myself. From my view ALM even without materials in the offing is a whole lotta lovely to be had for no more than the flip of a switch. Add material textures into that mix and you get a whole lotta lovely, PLUS potentially a big reduction in LI and rendering resources. Seems to me like this shouldn't be that hard a sell.
But some people experience performance hits with ALM turned on, some people might be worried by the word "advanced" and some people have never actually used anything but the slider bar and graphics settings by category (Low, High, Ultra etc), so have no real idea what individual graphics settings are or do. Add to that the fact that not all viewers left ALM in the same category of graphics settings (everything from med/high to Ultra last I looked) and you have a recipe for peeps holding back based on fear or confusion or simply overlooking the issue altogether.
If you thought ALM was too advanced for your graphics cards, or worse a setting that requires Ultra Graphics, maybe it makes sense to approach this cautiously. No one wants a fried GPU right?
And how are we supposed to know what our graphics cards can handle?
Nalates' Things & Stuff to the rescue!
I was delighted to find that her latest blog post offers excellent lengthy reportage from the most recent TPV meeting at which who can see materials was discussed. Scroll down to the last subheading "ALM Stats" for the discussion as well as Oz Linden's tip on how to find out if your graphics card can handle ALM.
Oz told Nalates where to look for the txt file in your viewer's installation folders to find a table that breaks what looks like all known graphics cards into classes. These classes are then used to determine what sort of graphics settings are suited to individual installations of Second Life based on system. In case that's not clear it means that when we download and fire up a fresh installation of Second Life, the viewer predetermines some graphics settings for us, based on among other things our graphics card classification as determined by LL.
I was pretty pleased with this info, but I found the table almost impossible to read or decipher in Wordpad. Indeed, I could not even find my own graphics card in the blizzard of bits and pieces of data. So I copied everything out of there and into InDesign to recreate the data as a table that regular humans can read. (No reformatting, and no changes were required - making tables based on weird typesetter symbols and codes is just something InDesign happens to know how to do - go figure.)
Graphics Cards by Class Table
Warning this small text file became a 22 page pdf so rather than copy it into this post, I have made it available here for preview or download.
So as Oz explains and Nalates relates, if your graphics card is a class 3 or above, you should have no trouble using ALM.
My suggestion is turn it on just to see what you've been missing and you'll be, as they say, Materials Ready. :)
So this week I tried to talk 3 different people out of bothering to learn how to use nodes in Blender to bake in specularity and to try to make a spec map in graphics instead.
There is no point, I said in faking what we can do for real, I said. Nodes are a bit advanced, I said. Even if you want to add a highlight effect, it will be easier to do it in a graphics program, I said. The less you give Blender to do with textures, the better I said. They didn't listen.
I'm not sure I blame them, because I wasn't all that sure I knew what I was talking about either. It was after all just a semi-educated guess. So I decided it was time for some science.
First off I confess that lately I have been overstating not using Blender to create textures to make a point. The truth is Blender is not that bad and it lets you do texture stuff in really an amazing variety of ways. That said, it's also true that I have a pretty large bias towards Photoshop. I have it and I'm pretty comfortable in there. The same cannot necessarily be said for the 3 Blender users I was trying to persuade away from using Blender to create textures, or for many more Blender users that show up in classes.
So this experiment uses a texture that was painted entirely in Blender texture paint using sampled photos. I did not even resize or adjust the photos before taking them into Blender. They came straight from CG Textures, to the tip of the texture draw brush in Blender.
After Painting the texture, I saved it as an image, and also baked an Ambient Occlusion map and saved that as well.
For the fake bake spec version, I loaded up the texture, the ambient occlusion, and a normal map (for more smoothness on this low poly pot) into a material assigned to the pot. Then I set up some lights around the pot. I really did NOT spend enough time on the lighting, and I am sure my highlights suffered because of it. A bit more thought and time spent on lighting would doubtless have made this a closer contest.
Next I needed a material node set up that would allow me to include specularity in the output - shown below:
To be fair to nodes (Compositing in Blender), they are not all that complicated, just something we're not used to (yet). I try to think of them as a diagram of the interactions and blends of pixels, kinda like layers and their operations and blends without the layering.
So having saved the fake baked specularity texture as an image, I got busy doing things my usual way in Photoshop. As usual, I combined the ambient occlusion map with the texture I painted and saved from Blender, added a solid background layer and saved the image as a 512px png for upload.
But since this is a contest of specularity effects created in Blender vs a spec map created in Photoshop using relatively familiar skills, I also needed to make a separate spec map.
Now if there is some right or wrong way to do this, I would love to hear about it, or even an average over all grey scale value range would be helpful. For now, I just try to come up with maps that I think will work based on whatever texture I happen to be using, and then I experiment with the settings in on the edit window in SL.
All I know for sure about this process is that the lighter the value is, the more specular the highlight can be in SL. So for this texture, since I wanted the rubbed metal bits, to be the ones that reflected light, and since they are a different color than the more oxidized bronze, I decided a Black & White Adjustment would be the way to go.
It wasn't dark enough over all.. specularity in SL is really shiny (or maybe that's me lol. again, I don't know what I am doing with this). So I added a levels adjustment to heighten the contrast and make the overall map quite a bit darker.
Then I saved the texture in the image above as a 512px png to use in world. Here's how they looked at the finish line:
I was surprised there wasn't more of a difference. In fact I was hoping that the difference would be so striking, and the pot with the spec map (on the left) to be so clearly superior, that not only would people stop bugging me to show them how to bake specular highlights into a texture in Blender, I would no longer need to bug them to go get a viewer with materials and start working on them.
Maybe next week.
Okies, so at first I didn't even plan to do baking an AO in the Blender 12 Steps Chair Class, but since everyone is doing sooo much better than I thought we would, I have been revising as I go along.
First I added an Ambient Occlusion bake to the end of Part 7, even though my own personal demo chair never got one, and has to live with the shame of the world's craziest ever UV map lol.
I guess I might have known that after the AO Bake, people would want to know how to combine the shading texture (AO) with the woodgrain texture into a final diffuse map (aka "texture" in SL). I always do this in Photoshop and in general I think you can get more options and better results using a graphics program to finalize your textures. But this can also be done in Blender with not too many extra steps after the Ambient Occlusion bake.
So I made is a video showing how you can do this in Blender and save the final image as the texture (aka "diffuse map" everywhere outside of SL).
Here you go.
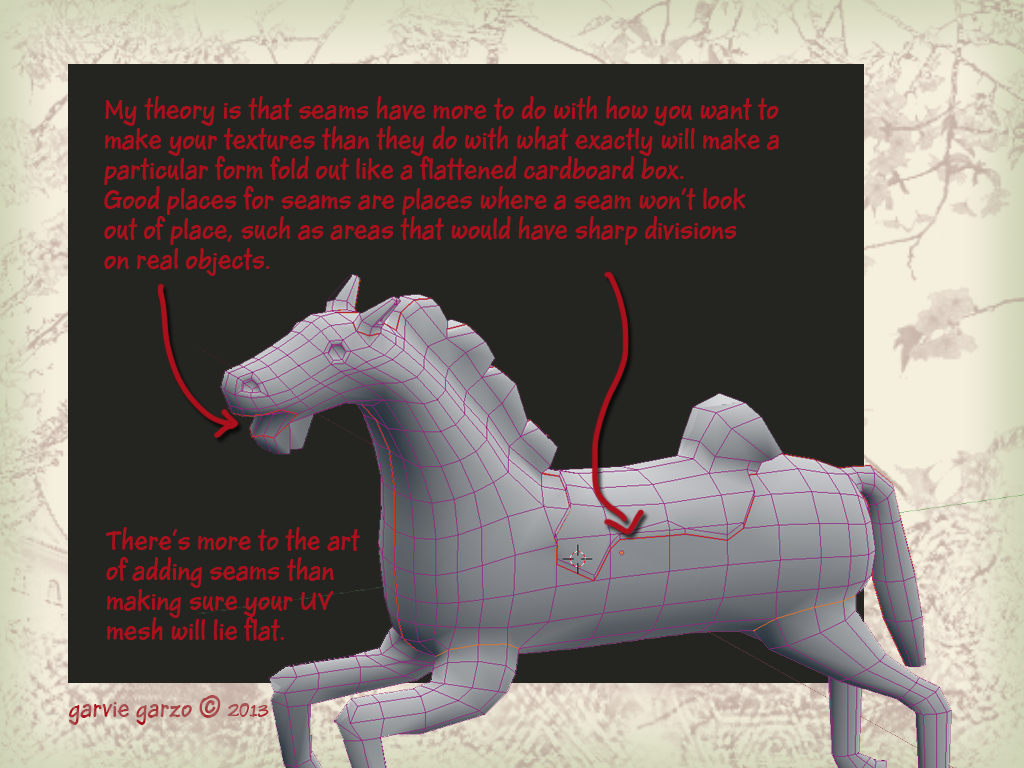
So this week I launched into Part 6 of the Box Modeling A Chair saga by introducing everyone to seaming a model in preparation for unwrapping. It was a crappy introduction. I should have said more to get the conversation started, explain that each side has a common goal or something. Anyway, here is a very brief guide to all the things I should have said just to get the party started.
Texturing is important. And a UV map is a requirement, not an option. You don't absolutely have to make your own UV map from the ground up by manually adding all the seams. But the more control you take at the UV mapping stage, the more control you will have over your final texture. Besides that, the more you understand about the relation between your model, its seams and its texture, the more you will understand about making mesh objects.
So let me briefly introduce you to seams in Blender, I think it might be the start of a beautiful friendship.